I’ve been using a pair of KEF LS50 Metas as my front speakers and my DIY KEF LS50 clone as the center channel speaker in my home theater for a while now. I’ve been generally happy with the smooth sound they produce, but there’s one thing lacking: dynamics.
Granted, these are small bookshelf speakers, but they receive assistance from my DIY subwoofers, so they don’t have to reproduce the most difficult frequencies of all: sub-bass. Unfortunately, at my listening distance of approximately 3.5 meters (~11.5 feet), they start to distort noticeably at higher volumes, which reduces the impact of certain movies, especially ones with epic soundtracks.
Lately, I’ve been thinking about building high-sensitivity speakers using pro-audio drivers. Horn-loaded compression drivers, which are used to reproduce high frequencies in the pro-audio world, can get really loud with little distortion. A well-designed horn can also achieve constant directivity – the horizontal and vertical dispersion of high frequencies are consistent and limited to specific angles (e.g., nominally ±45 degrees horizontal and ±30 degrees vertical).
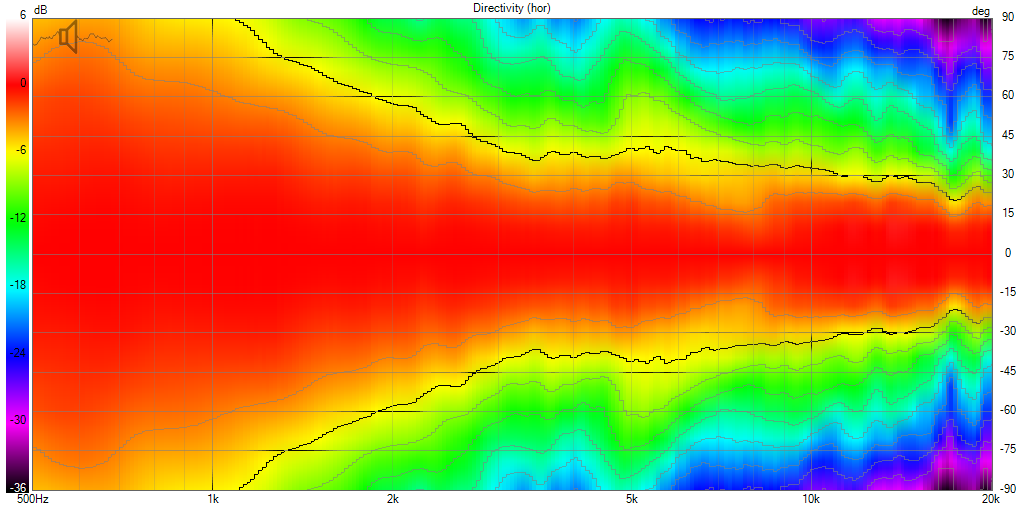 The horizontal directivity plot of a constant directivity horn as measured by mtg-designs.
Some hi-fi speakers that use waveguides can also control high-frequency directivity similarly to horns, but the waveguides they employ are usually not deep enough to boost the efficiency of the dome tweeters as regular horns do.
Coming from coaxial speakers, where the tweeter is located at the center of the mid-bass driver like the KEFs, my main goal, apart from improved dynamics, is to achieve decent vertical directivity.
With non-coaxial speakers, you need to position the mid-bass driver as close as possible to the tweeter to minimize driver center-to-center spacing. However, this is often not sufficient because you also need to use a lower crossover frequency than usual. Unfortunately, many tweeters will self-destruct if the crossover frequency is too low and the volume is too high.
With pro-audio compression drivers mounted on a horn, you can easily get them to play anywhere from half to a full octave below the lower limit of a typical dome tweeter (e.g., 1.6 kHz instead of 2.2 kHz). This helps with vertical directivity as wavelengths get longer the lower you go in frequency, resulting in less destructive interference between the drivers.
 A typical pro-audio speaker, often seen at events like weddings and live music venues, usually features a large mid-bass driver (12" and 15" are common) and a large horn. However, as you might guess, this results in high driver center-to-center spacing. Fortunately, you don’t need concert-level output in a typical home environment, especially when one is sitting within a few meters of the speakers. You want it loud, but not deafeningly so, if you value your hearing.
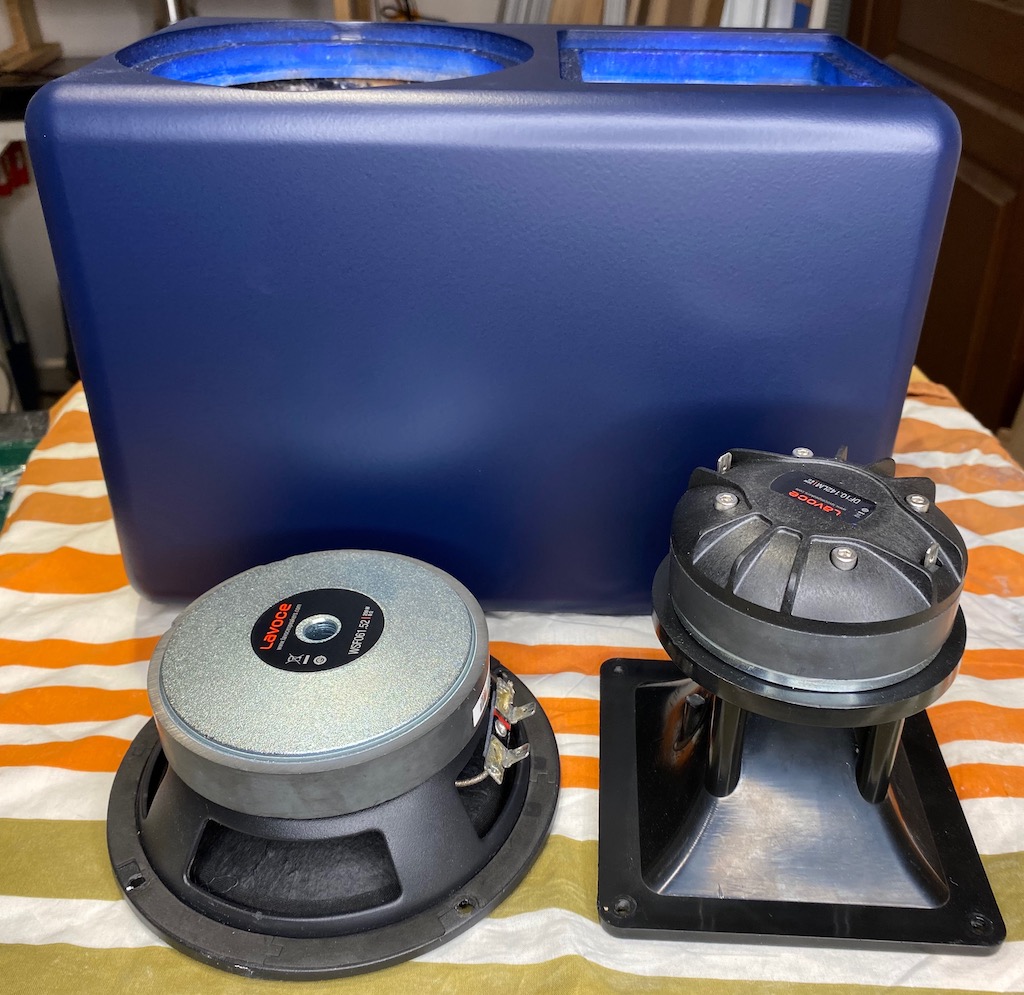
After doing some research, I came across small horns like the 13 cm (~5") B&C ME10 and a relatively high output 6.5" mid-bass driver: Lavoce WSF061.52. By using physically small components, a driver center-to-center spacing of 16 cm (~6.3") that corresponds to about 3/4 wavelength distance at the crossover frequency turned out to be possible. You can reduce the distance even more if you’re willing to mount the mid-bass driver from the inside, but 16 cm is good enough for me.
The only problem left is that the mid-bass driver’s frequency response takes a nosedive starting around 120 Hz, even after adding a port. No problem, though – I have multiple subwoofers with dual 12" drivers for low-bass duty. Let’s get to work!
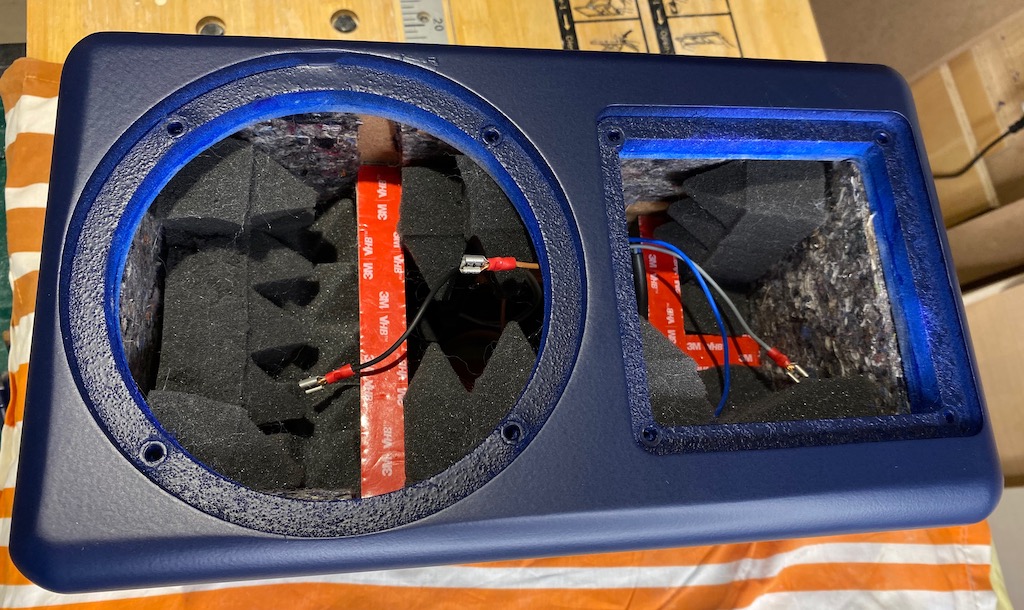
I designed a compact cabinet with internal bracing that touches the drivers, making the drivers part of the brace and reinforcing the front and rear sides of the cabinet.
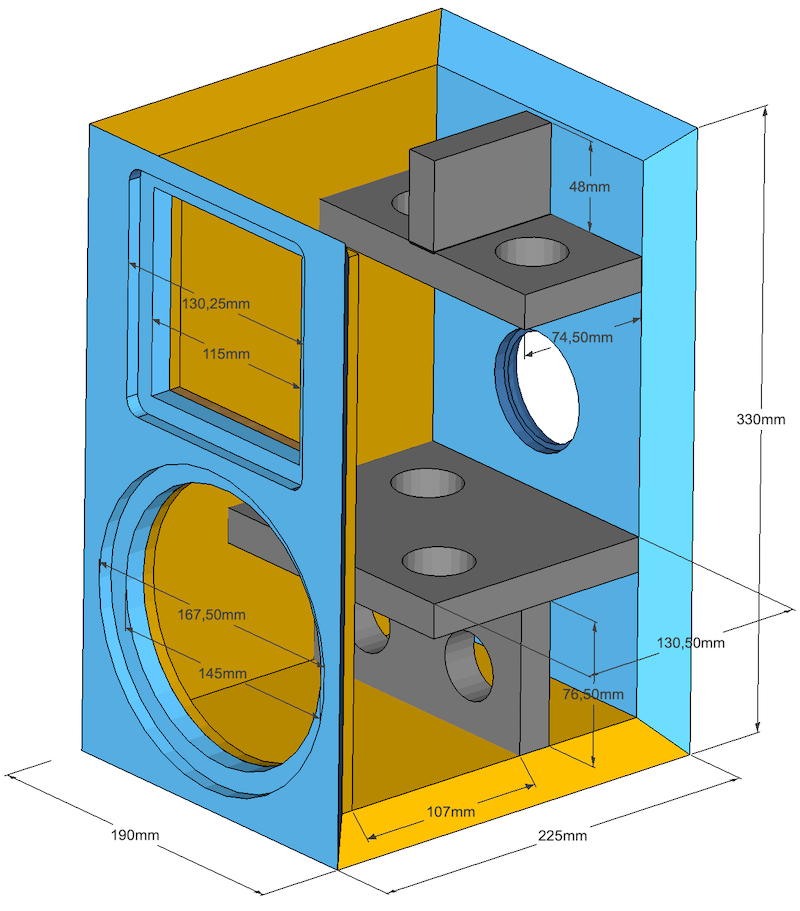 Cabinet drawing with dimensions.
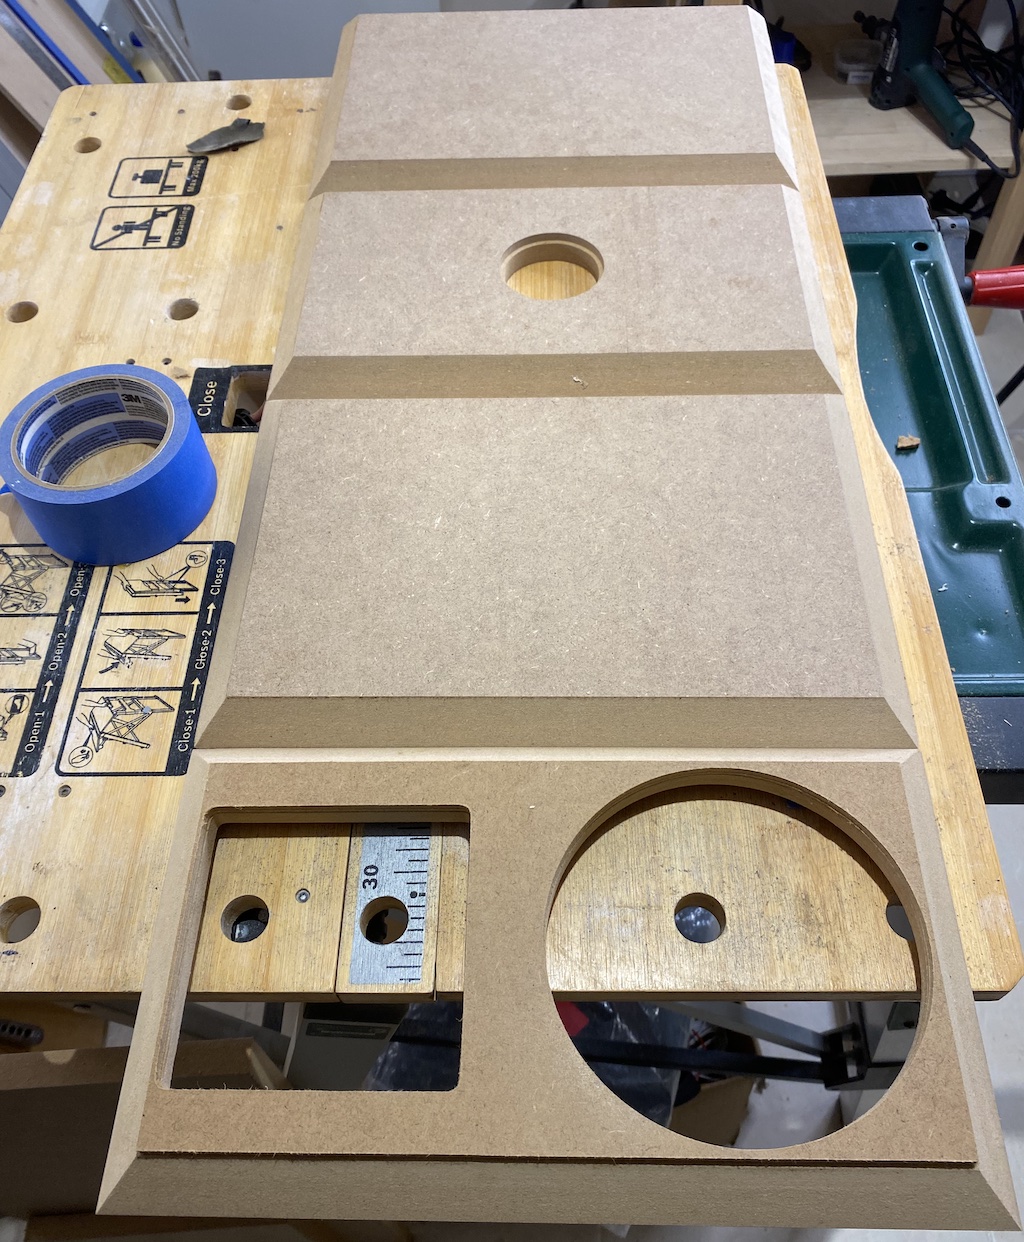
I cut the pieces on my CNC router using 18 mm (~3/4") MDF and then added 45-degree bevels to all sides on my router table. I also added a 6 mm MDF backing to the front baffle to make it stronger.
The pieces are simple enough that they can be cut with a circular saw or jigsaw, and the holes can be cut with a handheld router. The bevels are optional – one can also use regular butt joints after resizing the pieces, of course. I glued the pieces together using wood glue, aligning them with painter’s tape. Band clamps really came in handy for gluing.
 Parts ready for dry fit
Borrowing an idea from KEF, just like in my KEF LS50 clone build, I attached the braces to the walls with 3M VHB tape instead of regular wood glue. The soft layer in between acts as constrained-layer damping to reduce resonances.
I glued the port, made out of a plastic water pipe (5.7 cm inner diameter), to the back wall with hot glue. The port is quite short (only 3 cm, not counting the outside MDF flare). The crossover board is installed on the side wall with standoffs. I placed M4 threaded inserts into the front baffle so that I could remove and install the drivers as many times as needed without having to worry about stripping the holes, which is all too easy with MDF.
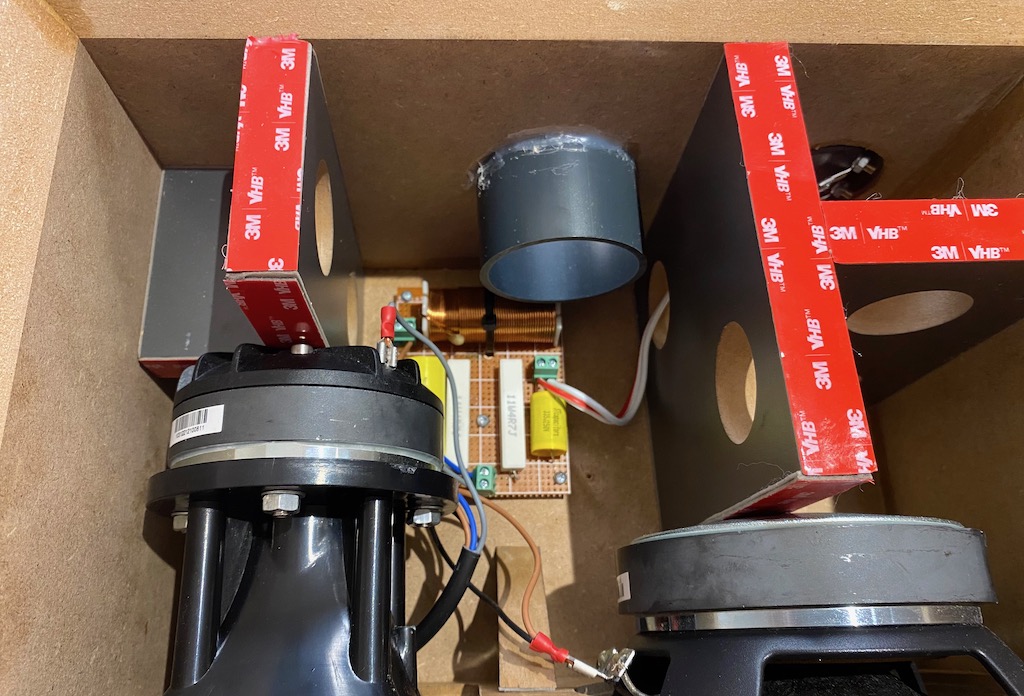 Braces installed, drivers and crossover board mounted.
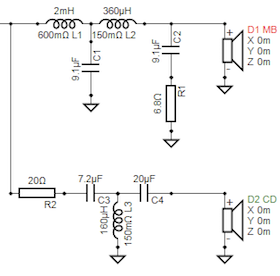
I was originally going to use an active crossover, but after doing a few simulations in VituixCAD, I noticed that a simple passive crossover with only five parts would work nicely. With active crossovers, you can get the frequency response ruler-flat, but you also need two channels of amplification and DSP –one for the mid-bass and one for the compression driver– whereas a passive crossover can make do with only one amplifier channel and no DSP. Additionally, active crossovers can have more background noise than passive crossovers because the amplifiers are connected directly to the drivers.
 I used a second order low-pass (a 2.5 mH laminated silicon steel core inductor in series and a 15 µF capacitor in parallel) for the mid-bass driver. For the compression driver, I used a first order high-pass (a 3.3 µF capacitor in series) and an L-pad circuit (two 4.7 ohm resistors in series/parallel) to reduce its level and flatten the response. You wouldn’t normally use a first order high-pass with compression drivers, but once again we are going to use it in a home environment where it will unlikely to be stressed, and besides, the electrical roll-off starts quite early. Finally, the compression driver is connected in reverse polarity to avoid a dip in the frequency response at the crossover frequency.
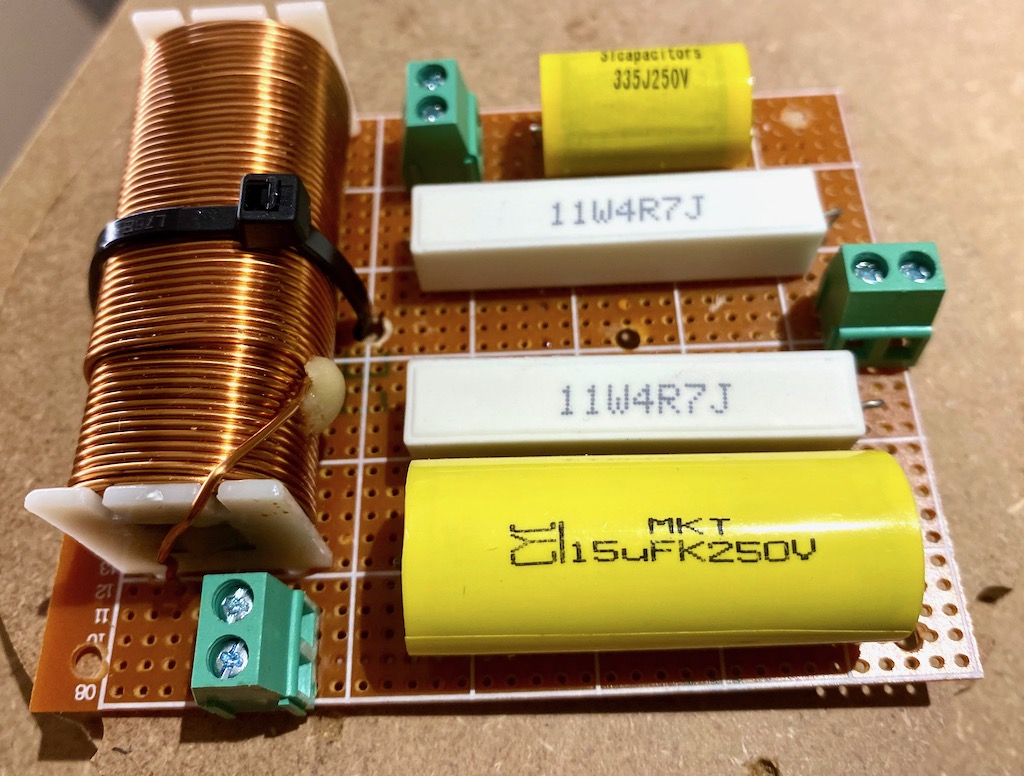 Crossover board close-up view.
I patched the rough spots on the cabinet with wood filler, sanded it smooth, and applied 19 mm (3/4") roundovers to all sides on my router table. Then I took the speaker outside and painted it with several coats of MDF primer using a spray gun. Once the primer had dried, I sprayed several coats of top coat (steel blue). Since I was using water-based paints, I added some paint conditioner (pouring medium) to help reduce orange peel.
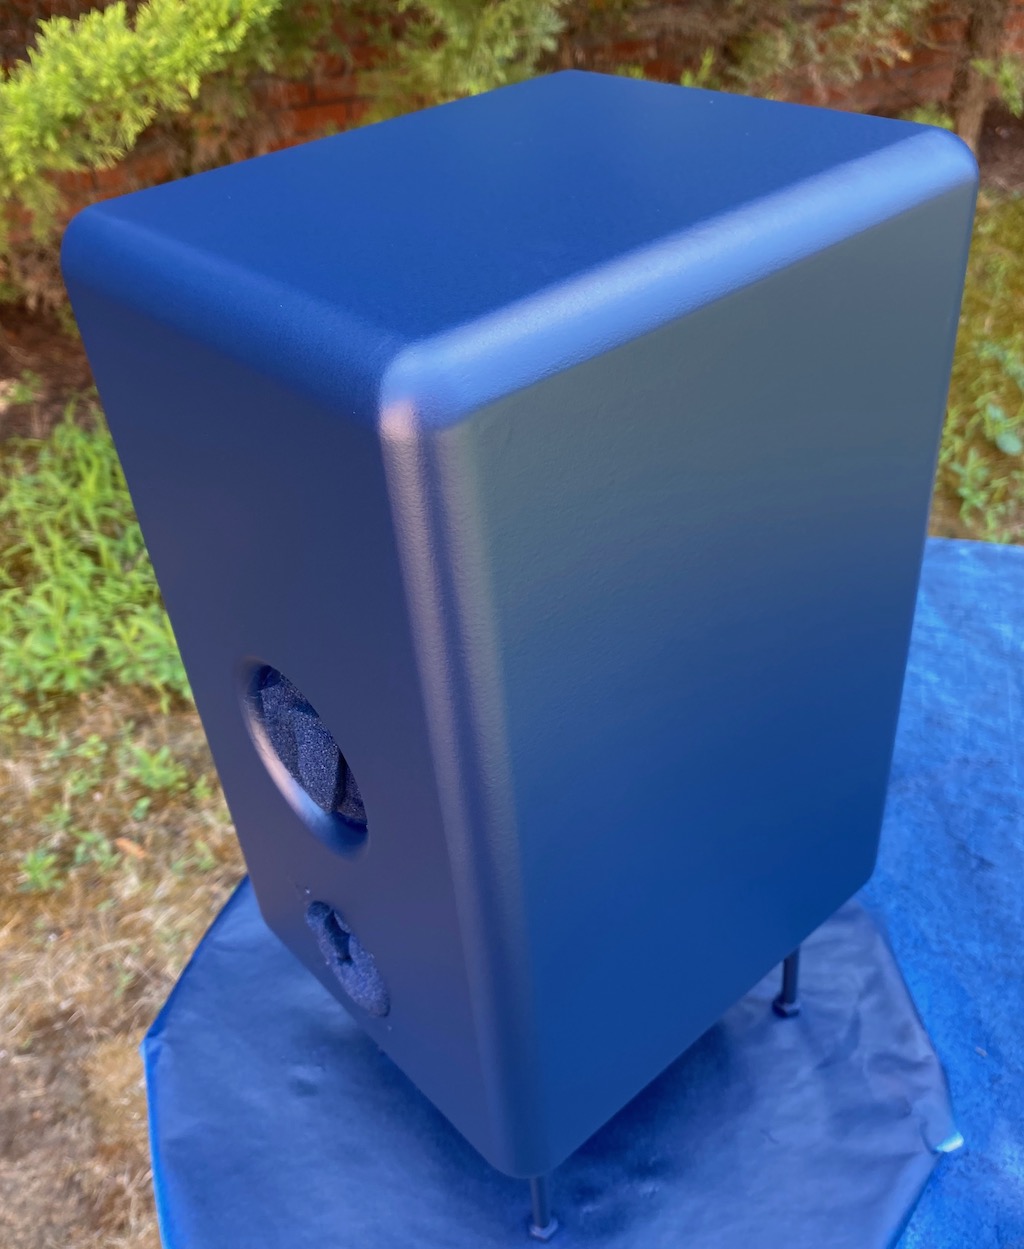 Cabinet Painted
Once the paint had dried, it was time to add absorption material to deal with the standing waves that would form inside the cabinet. I lined the walls with felt (5 to 10 mm thick) and placed extra-thick 60 mm pyramid foam on top, leaving enough space for the drivers, of course.
 Absorption materials placed in cabinet
Here’s the side view of the cabinet with drivers waiting to be mounted. The mid-bass driver, Lavoce WSF061.52, has a 1.5" voice coil and a paper cone, while the compression driver, Lavoce DF10.142LM, has a 1.4" voice coil and a polyester (likely Mylar) diaphragm.
 Cabinet side-view with drivers to be installed.
Finally, Valeria is complete standing next to one of my KEF LS50 Metas. They’re roughly similar in size. Valeria’s dimensions are 19 x 33 x 22.5 cm (WxHxD), while the KEF LS50 Meta is 20 x 30 x 28 cm (WxHxD).
 Valeria next to a KEF LS50 Meta
So, how does it sound? By itself, the bass is anemic, as expected. However, as soon as you add a subwoofer to the mix, this little speaker transforms into something special. Female vocals are particularly lifelike, thanks to the effortless dynamics and silky smooth sound of the compression driver. With tracks like “Can’t Catch Me Now” by Olivia Rodrigo, I found myself turning up the volume higher and higher, yet the sound remained clean throughout.
Valeria really shines at high volumes. In fact, on some bass-heavy tracks, I discovered bass resonances in my room that I hadn’t noticed before. With the LS50 Metas, I couldn’t turn the volume up that high without seriously distorting the sound.
Now, some measurements… The average sensitivity (300 Hz-3,000 Hz) is approximately 92 dB/2.83V/1m, measured with a UMIK-1 microphone. This means that only 1 to 2 Watts of amplifier power is needed to achieve very loud volumes at 1 meter from the speaker.
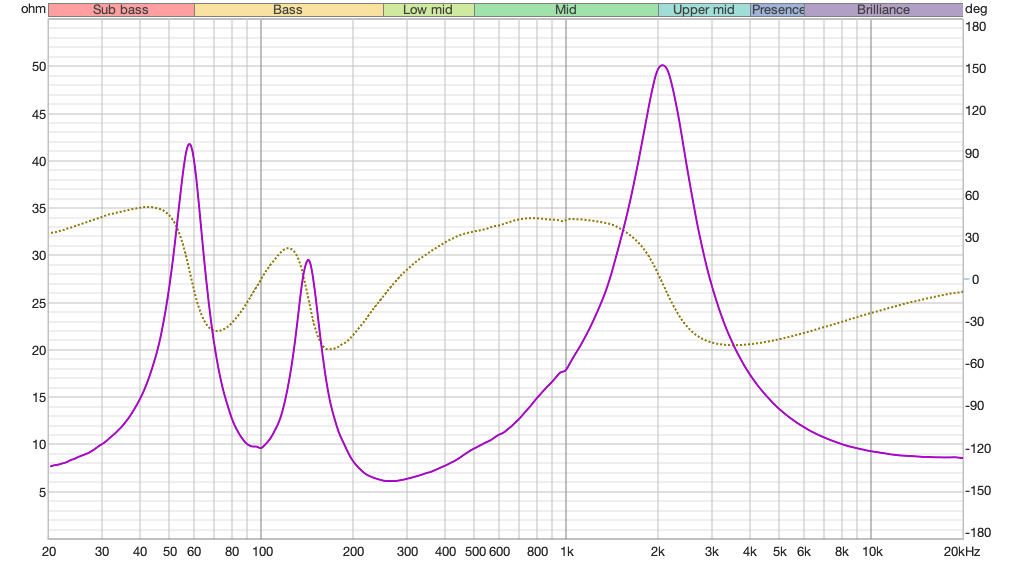
The impedance plot looks relatively clean, with the exception of a resonance at around 950 Hz. How audible this is, it’s hard to say. The nominal impedance is 8 ohms, and the worst-case EPDR (Equivalent Peak Dissipation Resistance) is around 3 ohms at 200 Hz, making Valeria a relatively easy load for the partnering amplifier, as John Atkinson would say.
 Impedance and phase plot.
The frequency response is mostly within ±3 dB from 120 to 20,000 Hz (quasi-anechoic measurement). The mid-bass to compression driver crossover frequency is 1.6 kHz. As for the subwoofer crossover frequency, 120 Hz looks like a good starting point. You can probably go a bit lower if you place the speaker close to walls, as this will result in some bass boost from nearby boundaries. It’s also a good idea to run the subwoofer(s) a few dB hot for optimal integration.
 On-axis quasi-anechoic frequency response.
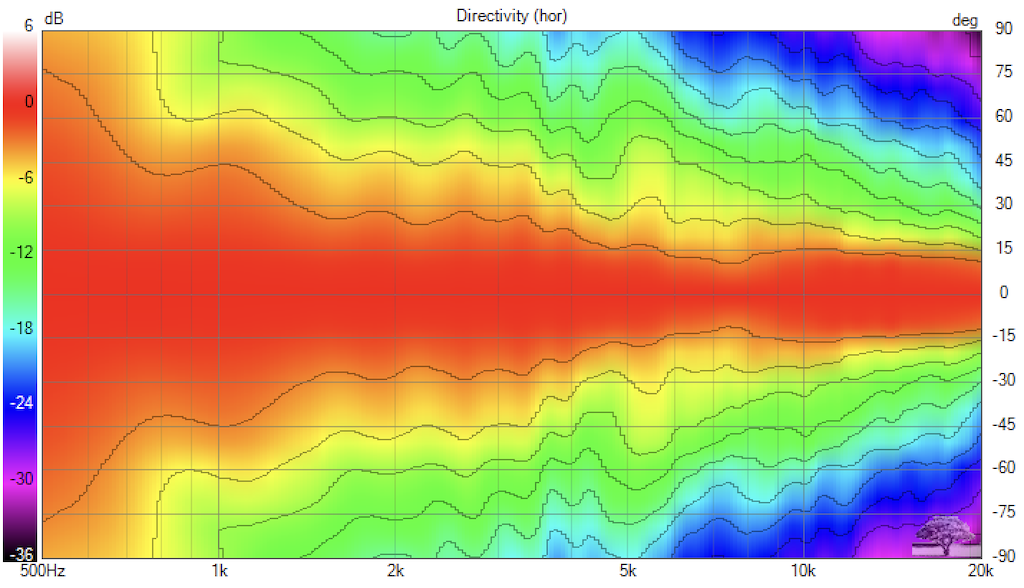
The horizontal directivity is ±45 degrees nominal, but starts to narrow gradually above 3.5 kHz. Thanks to the smooth directivity, the frequency response can be equalized without any ill effects.
 Smooth horizontal directivity (normalized).
It’s surprising how a small speaker like this one can get so loud yet manage to stay so clean. The trade-off, of course, is little to no low-bass output by itself, but that’s precisely what subwoofers are for.
Update (August 3, 2024):
DZCreeper over on Reddit suggested adding a foam plug to the throat of the horn and pointed me to an expired patent by Earl Geddes, who’s well known for his extensive research on waveguides.
The idea is simple: Placing some open-cell foam inside the horn will absorb internal reflections, leading to cleaner sound. The downside is the loss of 2 to 3 dB of high-frequency output, but since the crossover is already running the compression driver a few dB hot relative to the mid-bass driver, this shouldn’t pose a problem.
I got some 30 pores-per-inch (ppi) open-cell foam from a pet store, typically used for things like aquarium filters. I then cut the foam with scissors, and placed it loosely inside the horn throat. It’s important not to pack it tightly, otherwise you will lose too much output above 10 kHz.
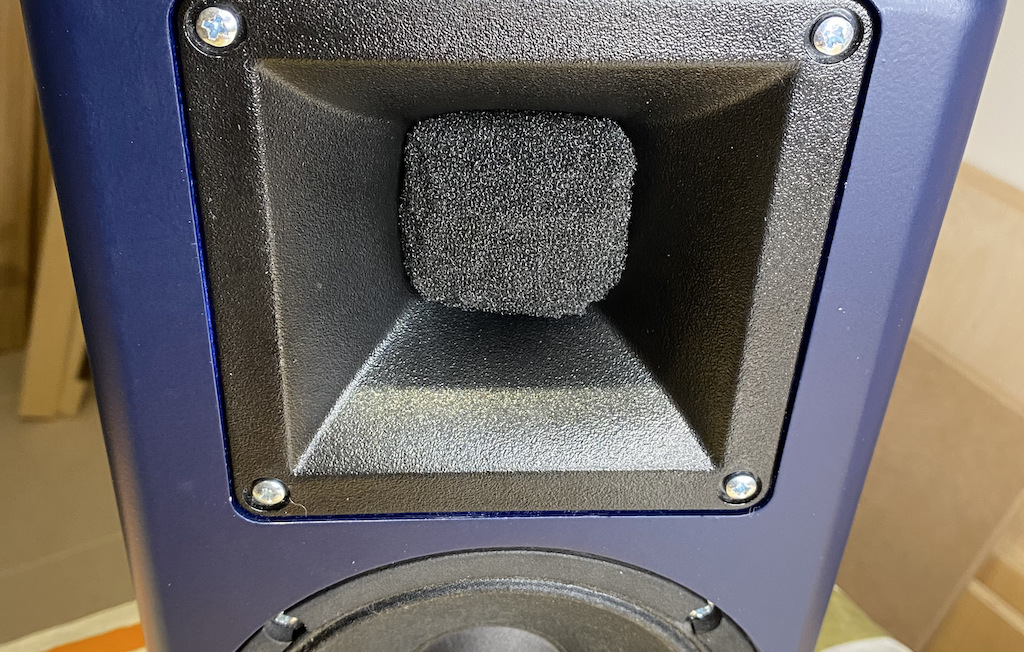 Horn phase plug made of open-cell foam.
With the foam plug in place, I was expecting consistent attenuation in the frequency range that the compression driver is producing, but I was pleasantly surprised to see the response immediately above the crossover frequency become smoother, not just lower in volume. It appears that the foam plug actually helped with the cancellation caused by the phase mismatch between the drivers over an octave above the crossover frequency.
As for any improvement in sound quality beyond the frequency response change, I can’t really tell. Geddes has written on several online forums that the effect would be subtle and not easy to measure, especially in well designed horns.
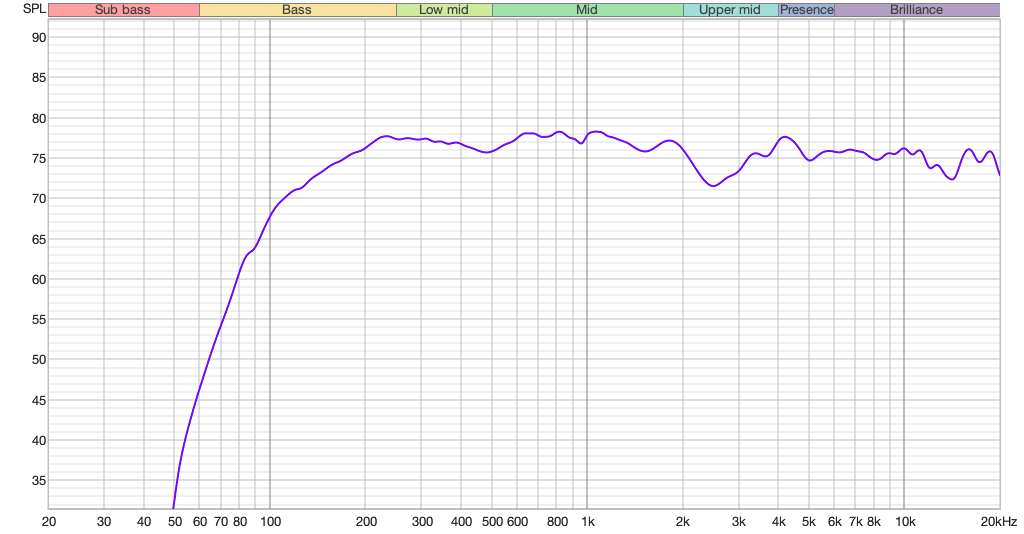 Frequency response after foam plug inserted.
With the foam plug, another pleasant surprise is the improved horizontal directivity, which has become more balanced.
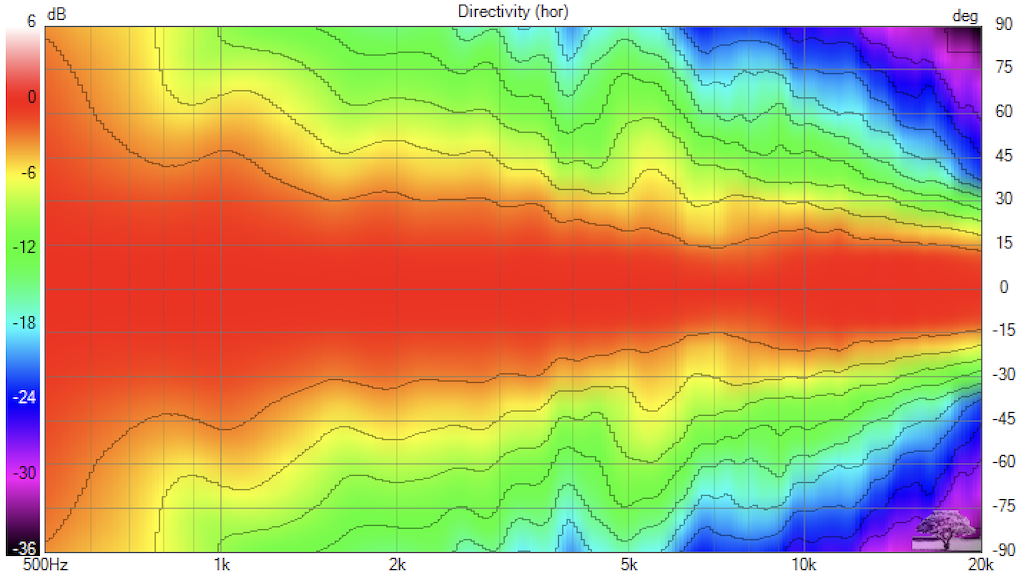 Improved horizontal directivity with foam plug.
 Alternative Crossover:
Finally, DZCreeper has graciously designed an alternative third order crossover for Valeria. It has a few more parts, but offers a relatively flatter response.
Update (Dec 2, 2024):
The frequency response graphs and the sensitivity figure have been updated to account for the speaker baffle effect in near-field measurements.
Related: